How to Stop Your DIY Manicure from Chipping
As some of you may know, I used to be a Nail Technician before I fell in love with the art of semi-permanent makeup.
One of the biggest complaints of home manicures is that they don’t last as well as a professional manicure. This is GREAT!! It shows your professional knows their stuff. But it doesn’t help you right now, right?
So whilst I’m not expecting to turn you into a Professional Nail Technician with a few tips, I can certainly help shed some light on how to stop your DIY manicure from chipping.
To clarify, I am talking about regular polish (that dries on its own), not gel (polish that requires a UV lamp to cure and is touch-dry within 30 seconds).
What Causes Nails To Chip?
1. Soaking Nails
Your nails are porous, which means that they soak up water and moisture. It’s important to make sure that haven’t had your hands submerged in hot water for more than a few moments just before painting your nails. This is unlikely to happen in a salon, but at home, you could very well be doing your manicure straight after washing up or coming out of the bath.
It’s true that you’ll be soaking them briefly for the nail preparation stage of a manicure, but the water temperature will be considerably lower than bath or washing up water temperature, and the period of time your nails are soaked will also be considerably less. Of course, by the time you’ve done your cuticle work, the nails will be adequately dry.
2. Poor Nail Preparation & Cuticle Removal
This is the most important part of the manicure, not only because it will prevent premature chipping, but failure to prep the nail properly will result in polish overflowing onto the skin, an unsmooth finish and sheer disappointment!
For prepping the nail, you will need:
- Acetone-free Polish
- Cotton Pad
- Metal Cuticle Tool
- If you’re inexperienced with gently gliding this tool on your nail plate, then please use wooden or plastic orangewood stick to prevent damaging your nails and surrounding skin.
- Nail Clippers
- 240 Grit Nail File
- The higher the grit, the more gentle the file, which reduces trauma to the natural nail
- Small Bowl of Warm Water
- With a tiny amount of hand soap
- Cuticle Clippers
- Only use these if you’re confident doing so
- Clean Hand Towel.
Steps For Effective DIY Manicure Preparation
- Make sure you’ve washed your hands and equipment.
- Submerge one hand in the bowl of warm water for between 1-2 minutes, then remove and place on a towel (no need to dry, as this will keep the cuticles soft).
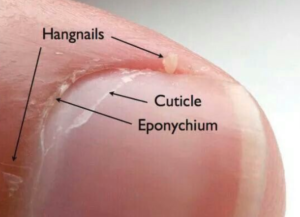
- Place the rounded end of your metal cuticle pusher onto the middle of your nail and gently glide upwards (towards your knuckles). You will notice a white/translucent film being lifted away from the nail plate; this is a dead skin cell and is called ‘cuticle’. If you reach the nail fold, the cuticle should lift up and come off on its own. If it doesn’t, use the cuticle clippers to carefully remove it. DO NOT cut the eponychium, as this is live tissue and cutting it can cause bleeding, infection, or thicker dried jagged skin to grow back. If you have hangnails, use the cuticle clippers to remove them. Repeat this process on the other hand.
- Next, cut your nail with clippers.
- Shape your nails with the file. If you’re using a lower grit file than 240, file in one direction and not side to side as this ‘sawing’ action will encourage the layers of your nail plate to separate and split.
- Repeat these steps for all nails on both hands.
- Finally, cleanse the nails with a cotton pad soaked in non-acetone nail polish. This will remove any oils on the surface that will stop the polish from adhering properly.
3. Not Using a Base Coat
Base coats are not optional; they have 3 very important purposes. Firstly, base coats prevent the natural nail from becoming stained by the coloured polish. Base coats are designed with a protective quality that prevents your nails from yellowing over time from the use of polish.
Secondly, base coats act like a double-sided sticky tape (yes, Blue Peter comes to mind)! It holds onto the nail on one side, and on the other it holds the colour. Coloured polishes do not have this double-sided sticky tape quality so it’s essential that you use it if you want your mani to last.
Finally, applying the transparent base coat slowly and accurately will make your life considerably easier when applying the colour, as the base coat will act as a ‘guide’ for the colour polish to follow. Start by pressing the brush on one side of the bottle neck when withdrawing so that only one side of the brush has product. Next place the brush onto the centre and ⅔ up on the nail plate and push the product towards the proximal nail fold, but without touching it. This will give you a nice ‘U’ curve. Now drag the colour down and repeat on both sides. Use this same method when applying colour.
4. Applying Each Layer Too Thickly
Regular polish dries by evaporation. Applying the layers thinly will allow the polish to dry between each coat. To achieve an even colour it’s better to do multiple thin layers, rather than one thick one.
5. Not using a top coat
Top coats are not just used for shine. They are there to lock in the colour and there are some incredibly high performing top coats on the market. My favourite is ‘Seche Vite’. Not only is it hard-wearing, but it penetrates the colour and ‘plumps’ it out, smoothing away any imperfections of application or any ridges on my nails. This product actually makes my regular polish look as shiny and as smooth as a gel mani!
6. Not Following Aftercare Advice
We’re all guilty of leaving the salon with gorgeous nails and forgetting that the evaporation process required to dry regular polish can take hours! Yes hours…. whilst the top of your colour may be touch-dry, you need to remember that the lower layers are not. For that reason avoid getting your hands wet.
🤔 Remember: If your nails are exposed to water, they will expand (as the nails are porous) and create a movement between the nail and the polish which will cause your manicure to chip prematurely.
After More DIY Beauty Tips?
Good luck with your next home manicure!
If you have any queries, please don’t hesitate to contact me.
Looking For A Home SPMU Provider?
Fill in your details here and I’ll either respond by email (or WhatsApp if you provide your number) and we can start to discuss your needs and the best option for you.
A FREE consultation is just that – a free, no obligation discussion to understand what your requirements are and how Sublime Beauty can help.
Sublime Beauty Contact Details
Sublime Beauty is a mobile business, serving the London Boroughs of Bromley, Greenwich and Croydon.
62 Greenway
Chislehurst
Kent, BR7 6JF