
How to Shape Your Eyebrows in 1 Easy Guide
Have you ever looked at someone’s perfectly shaped brows and thought, “How do they do that on their own?” Maybe you’ve even tried it yourself — only to end up with brows that don’t quite match, or worse, far thinner than you intended (hello, 1990s!).
Here’s the good news: with the right technique, you can shape your own eyebrows at home — and get great results.
This guide will walk you through exactly how to do it, step by step. As long as you don’t have any physical challenges that might make precision difficult (like visual impairments or unsteady hands), this is absolutely doable — and budget-friendly, too.
I’ll be sharing an insider technique called Face Mapping — the same one I use in my professional SPMU eyebrow treatments to help clients find their perfect eyebrow shape. It works by using your unique facial features as a guide, so the result is a set of brows that truly suit you.
How long will it take to shape my eyebrows?
The Face Mapping and plucking process took me around 30 minutes, but that’s because I’m a perfectionist and had the good fortune of an hour to myself, whilst my daughter tormented her Daddy for an ice cream at the park!
It’s important to note that although Face Mapping is used to determine the shape of a good brow during a SPMU consultation, the end result of this article will not replicate a semi permanent makeup treatment. This is because I have existing gaps in my eyebrows that SPMU would fill in.
For this article, I’m using the Face Mapping method to pluck away unwanted hairs.
What You Need to Shape Your Eyebrows
You will need the following to shape your eyebrows at home:
- Tweezers: Nothing fancy required here. I bought myself this tweezer set because it’s a good price and it has a couple of extra bits in it that I’ll also use from time to time.
- An Eyeliner Pencil: I’m using an official microblading pencil, but a regular eyeliner pencil is fine.
- Cotton Pads: Used for wiping away any hairs that may stick to your tweezers and for cleansing. I opt for re-usable cotton pads for myself and make sure they’re thoroughly cleaned, but one-use pads that you can use for general makeup removal also work well.
- Soothing Cream: This is to apply to the area after plucking. I use one containing Aloe Vera to calm the area. Try not to use anything that’s particlarly scented, especially if you’ll be plucking.
- A 30cm Ruler: I borrowed my daughter’s ruler! I have of course washed it and used an anti-bac wipe. This is important as you’ll be resting the rule against your face. While you pluck hair follicles, the skin remains ‘open’ for a time. You don’t want any bacteria entering the skin at this vulnerable stage.
How to Shape Your Eyebrows
Ready? Let’s go!
Step 1: Prep Your Skin and Tools
Start by tying/clipping your hair back so your face is fully visible and unobstructed. Cleanse your face and especially your eyebrow area thoroughly – this helps prevent bacteria from entering open pores after plucking.
Tip: Use a gentle cleanser and pat the area dry with a clean towel.
Next, sanitise your tweezers and any other equipment – ideally with rubbing alcohol, but you can do this with warm soapy water and drying with a clean, dry cloth. This step is crucial for avoiding breakouts or infections.
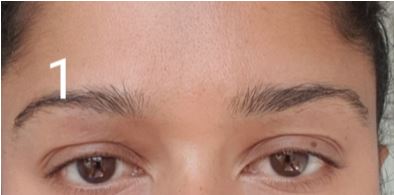
Step 2: Find the Centre Point of Your Brows
Place your ruler vertically from the tip of your nose straight upwards toward your forehead. This is where your brows should ideally start and be evenly balanced across your face. Use a light-coloured eyeliner or brow pencil to mark this point above each brow.
Note: If you’re following diagram 2 below, remember that the yellow dotted line is slightly offset so you can see the pencil mark, but yours should be centred.

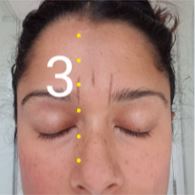
Step 3: Mark the Inner Brow Start Points
Now, find where each eyebrow should begin individually. Place the ruler vertically, this time aligning it with the outer edge of your nostril, where it flares out the most. Follow the line up and make a small mark on your brow bone. Repeat on the other side so you have the starting pint for both brows.
Since this is where your eyebrows will start, any hairs growing between these points and the centre line you marked earlier can be safely removed – but only after you’ve mapped out the full brow shape (after step 6).
Step 4: Map the Top and Bottom Lines of Your Brows
Using your eyeliner pencil, draw two horizontal lines: one along the bottom edge of your brow hairs and one across the top edge. These will define the thickness of your brows based on your natural shape.
You should now see a clear rectangular ‘box’ forming the structure of your brow. Join the corners of this box to ensure alignment and symmetry – it should look balanced and intentional. This tells you that your markings so far are accurate, and you can proceed.
Repeat the same box outline for the other brow.
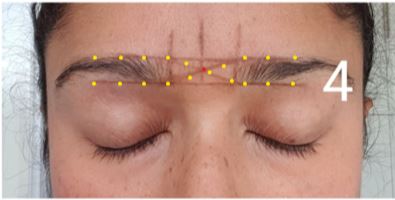
Note: If this was an SPMU treatment, you could decide on the thickness you would want your eyebrows to be.
Step 5: Measure the Ideal End Point of Your Brows
To find where your brows should naturally end, place the ruler at the corner of your nostril again. This time, angle it diagonally so it passes along the outer corner of your eye.
Mark where this line intersects with your brow – this is the tail end. Then (you’ve guessed it!) do the same for your other eyebrow.
Any hairs growing beyond this point (towards your temples or hairline) can be plucked.

Step 6: Locate the Arch or ‘Peak’ of Your Brow
For a natural arch, start at your nostril once more (like you did in step 5) and angle the ruler so it goes directly through the centre of your pupil (look straight ahead in the mirror).
Where the ruler meets your brow is where your arch should peak. Mark this point. Then, connect your arch to the inner and outer points you’ve already marked, completing your outline.
Now you’re ready to pluck: remove only the hairs outside this mapped area – leave everything inside intact for now.

Step 7: Pluck with Precision and Care
Use a good-quality, slanted tweezer for better control. Always pluck in the direction of hair growth to minimise pain and prevent breakage.
Work in natural light if possible, and take your time.
Tip: Step back from the mirror occasionally. Up-close views can make you overpluck.
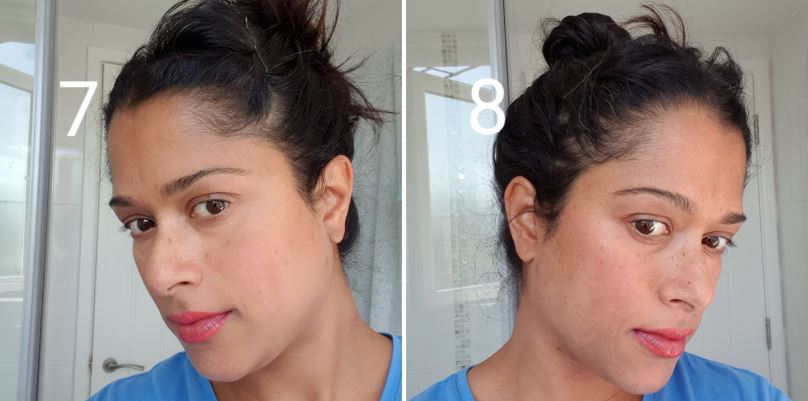
Step 8: Check for Symmetry – But Don’t Overthink It
Brows are sisters, not twins. Some slight variation is normal because our faces aren’t perfectly symmetrical. If one arch is subtly higher or longer, don’t panic.
As long as your brows are balanced and enhance your natural features, they’re doing their job.
Note: During Microblading, or other SPMU eyebrow sessions, it is possible to make very minute adjustments so the eyebrows look more symmetrical, but the overall look of the face and its features are the priority.
Step 9: Fill in Sparse Areas for Definition
If you’d like a polished, fuller look, you can use a brow powder, pencil, or pomade.
Start by brushing your brows upwards, then use a flat or angled brush, dip into a brow powder (e.g. Barry M Brow Kit or similar) and apply with light, hair-like strokes where needed.
Begin at the tail and work inward – this gives a more natural fade. You’ll always want to start with very little and build up the colour intensity gradually until you’re happy with the results.

Step 10: Set Your Brows (Optional but Recommended)
To finish, use a clear or tinted brow gel to brush your brows into place and hold them throughout the day. This step gives a professional, tidy finish and keeps everything where it should be.
Ready For A Semi-Permanent Solution?
I hope you have found this blog of some use to you and you can now shape your eyebrows more easily. As with everything, your confidence will grow the more and more you do this!
But if you’re just not vibing with dealing with your brows day after day, you can book in for a FREE consultation to see whether SPMU eyebrows would be a good fit for you.


One Comment
Comments are closed.